How to Create and Submit an XML Sitemap
Creating great content is a huge part of most SEO campaigns, but what can you do to get your new pages landed on from Google as quickly as possible? The first step is to make sure Google indexes the new page quickly. If you make sure the page is linked to from another location on your site, Google will find and index it eventually, but the best way to get Google crawling is to submit a new XML sitemap whenever you add new content to your site. Unlike an HTML sitemap, XML sitemaps have no formatting and are meant for search engines, not users.
Creating an XML Sitemap
Follow the steps below to learn how to create, test and submit an XML sitemap.
*Note: For this example, I will create my sitemap using a site crawling tool called Screaming Frog.
Step 1. Type the URL of your site into the “Enter url to spider” box.

Step 2. Click the “Start” button to begin the site crawl.

Step 3. Wait until the completion bar reaches 100%.

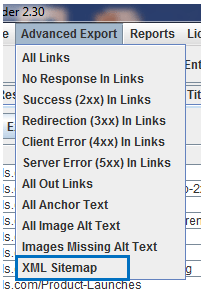
Step 4. Select “XML Sitemap” under the “Advanced Export” dropdown and save the file to your desktop with the name sitemap.xml.
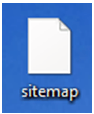
Step 5. Go to your desktop and open the sitemap file with a text editor such as Notepad.
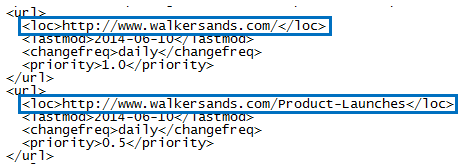
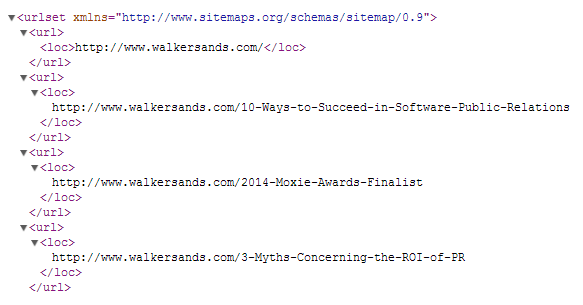
Step 6. To get your sitemap ready to submit, you will need to delete several pieces of data from the file. When you open the file, the first few lines will appear as shown below. Delete lines 1, 3, 4 and 5 so all that remains is the line that begins with “urlset.“

Step 7. Below the “urlset” line, you will see the URLS. Delete lines 3, 4 and 5 (lastmod, changefreq and priority) for each URL in the file.
*Tip: Use find and replace to remove the unneeded lines instead of deleting each line manually.
Once you are done deleting, the file should look like the image below.
Step 8. When your file looks like the image above, you are ready to upload the xml file to your site. After you upload it, check to see if the file is on your website by typing www.yourdomain.com/sitemap.xml into the address bar. If you get a 404 error, the file was not uploaded correctly.
Submitting an XML Sitemap through Google Webmaster Tools
Once you create the XML sitemap and successfully upload it to your website, you are ready to let Google know there’s a new sitemap to crawl. The best way to do this is through Google Webmaster Tools. Follow the steps below to test and submit your sitemap.
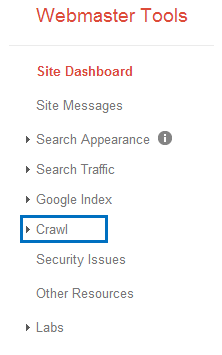
Step 1. Once you log into your Google Webmaster Tools account and verify your website, go to your “Site Dashboard.”
Step 2. Click on “Crawl” on the left hand side of your dashboard.
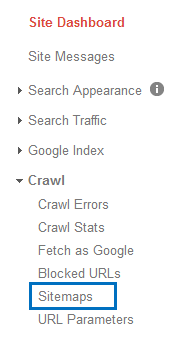
Step 3. Click on “Sitemaps” in the “Crawl” dropdown.
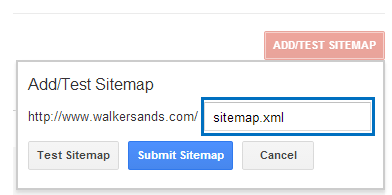
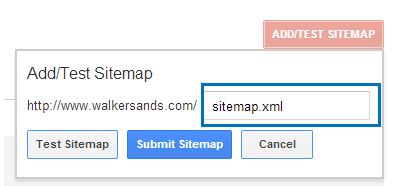
Step 4. When you get to the “Sitemaps” page, click on the “add/test sitemap” button at the top, left-hand side of the page.

Step 5. Enter the file name of your sitemap into the box provided.
Step 6. Click on the “Test Sitemap” button to make sure there are no errors in your sitemap.
Step 7. Once the test is complete, you will see the message below. Click on the “View test result” button to see if errors were found.

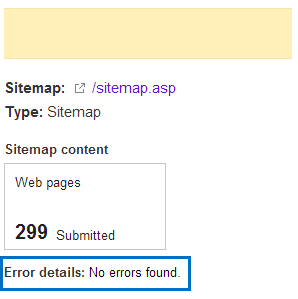
Step 8. Once you press the “View test result” button, you will receive the information below. Check under “Error details” to see if any errors were detected. If errors are listed, fix the specified issues. If there are “No errors found” you are ready to submit your sitemap.
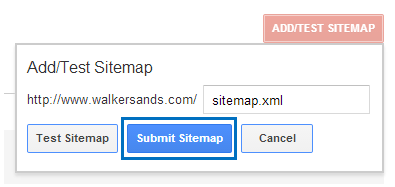
Step 9. Click on the “add/test sitemap” button.

Step 10. Enter the file name of your sitemap into the box provided.
Step 11. Click the “Submit Sitemap” button.
Step 12. Once you press the “Submit Sitemap” button, you will receive the notification below. Click the “Close” button.

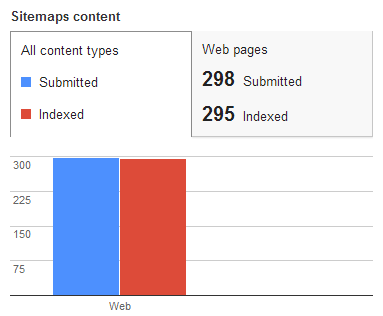
Step 13. Congrats! You’ve submitted your XML sitemap. Keep an eye on the number of webpages that have been indexed into the search engine in the “Sitemaps” section of Google Webmaster Tools.